reviewed by Truman Perkins
You don't need a greenhouse or fancy setup to get seeds sprouting quickly indoors — you need the right conditions and a bit of patience. Whether you're getting a jump on spring or growing year-round, these germinating seeds indoors tips will help you achieve faster, more consistent results with less wasted seed. Indoor seed starting is one of the most rewarding skills in home gardening, and once you dial in your process, you'll wonder why you ever bought transplants from the store.

The truth is, most seed-starting failures come down to a handful of preventable mistakes. Too much water, not enough warmth, poor-quality soil, or simply forgetting to read the seed packet — any one of these can stall germination or kill seedlings outright. This guide covers everything from choosing the right equipment to troubleshooting stubborn seeds, so you can grow healthy transplants every single time.
Below you'll find nine sections packed with practical advice, a cost breakdown to fit any budget, and answers to the most common questions new growers ask. Let's get your seeds in the soil.
Contents
Starting seeds indoors isn't just for impatient gardeners. It's a strategic move that extends your growing season by weeks — sometimes months — depending on your climate zone. When you germinate seeds in a controlled indoor environment, you eliminate the unpredictability of late frosts, heavy rain, and temperature swings that can destroy outdoor sowings.
By the time your last frost date arrives, your indoor-started seedlings are already several inches tall with established root systems. That means earlier harvests and longer productive seasons. This is especially valuable if you're growing fruits in containers or warm-season crops like tomatoes and peppers that need every bit of growing time they can get.
Timing your sow date correctly is the single biggest factor in transplant success. Count backward from your expected last frost date using the "days to transplant" info on your seed packet. Most vegetables need six to eight weeks of indoor growing before they're ready to move outside.
Garden centers stock a limited selection of transplants. When you start from seed, you unlock hundreds of heirloom, specialty, and region-specific cultivars that you simply cannot buy as starts. This is one of the most overlooked germinating seeds indoors tips — you're not just saving money, you're expanding what's possible in your garden.
Pro tip: Keep a simple spreadsheet tracking which varieties you start each season, their germination rate, and days to sprout. After two or three rounds, you'll know exactly which seeds perform best in your setup.
You don't need to spend a fortune, but having the right tools makes a noticeable difference in germination rates and seedling health. Here's what actually matters.
Standard 1020 flats with cell inserts are the workhorses of indoor seed starting. They're reusable, inexpensive, and available in different cell sizes. For larger seeds like beans — great for classroom projects and home gardens alike — use deeper cells or individual pots to give taproots room to develop.
Peat pellets and soil blocks are solid alternatives if you want to minimize transplant shock. Soil blocks, in particular, encourage air pruning of roots, which builds a denser, more fibrous root system. Avoid using random household containers without drainage holes — waterlogged seeds rot within days.
A sunny windowsill works in a pinch, but supplemental lighting is the difference between leggy, weak seedlings and stocky, vigorous ones. Understanding direct versus indirect sunlight helps, but for consistent results, invest in full-spectrum LED grow lights. Position them two to four inches above your seedlings and run them for 14 to 16 hours daily.
Heat mats are essential for warm-season crops. Peppers, tomatoes, and eggplant germinate significantly faster when soil temperature stays between 75°F and 85°F. Without bottom heat, these seeds can take three to four times longer to sprout — or not sprout at all.
Good germinating seeds indoors tips always come back to the fundamentals: proper soil, correct moisture, and appropriate depth. Nail these three and your success rate jumps dramatically.
Use a sterile, soilless seed-starting mix — not garden soil and not standard potting mix. Seed-starting mixes are finer in texture, drain evenly, and are free of weed seeds and pathogens. If you're curious about what happens when growing media sits too long, potting soil can degrade over time, so always use fresh mix for starting seeds.
Pre-moisten your mix before filling cells. It should feel like a wrung-out sponge — damp throughout but not dripping. Dry mix repels water and creates air pockets around seeds, while soggy mix invites damping-off disease, a fungal killer that topples seedlings at the soil line.
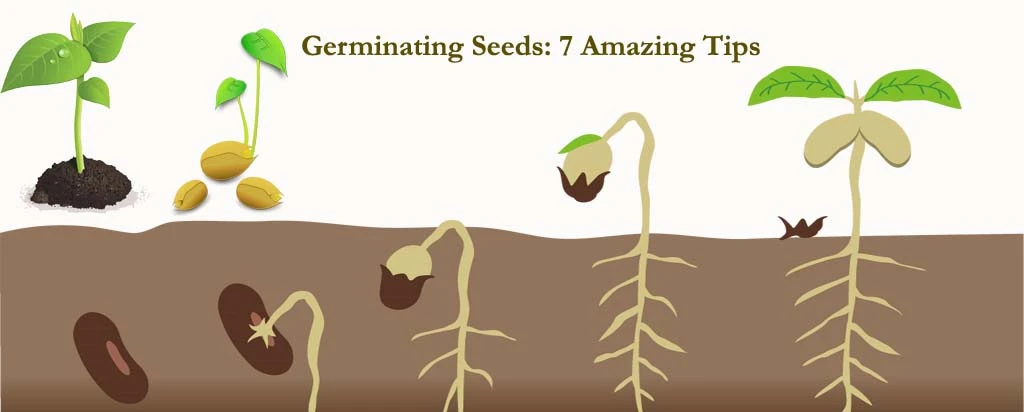
The general rule: plant seeds at a depth equal to two to three times their diameter. Tiny seeds like lettuce and basil barely need covering — just press them into the surface. Larger seeds like squash and beans go half an inch to an inch deep.
Some seeds require light to germinate. Lettuce, petunias, and certain herbs need to remain on the soil surface with only a light dusting of vermiculite. Always check the seed packet. This is basic information that catches experienced growers off guard when they switch to unfamiliar varieties.
Warning: Planting too deep is the number one reason seeds fail to emerge. When in doubt, go shallower — a seed that's slightly too shallow will still sprout, but one buried too deep may never break the surface.
Germination is only half the battle. The first two weeks after sprouting are when seedlings are most vulnerable to disease, legginess, and nutrient deficiency.
Bottom watering is the gold standard for seedlings. Set your tray in a shallow dish of water and let the soil wick moisture upward for 15 to 20 minutes, then drain the excess. This keeps the soil surface drier, which discourages fungal growth and strengthens stems.
Hold off on fertilizer until your seedlings develop their first set of true leaves — the second pair that appears after the initial seed leaves (cotyledons). Then feed with a diluted liquid fertilizer at quarter strength. Full-strength fertilizer burns tender roots and does more harm than good. Understanding day and night cycles for plants also matters here — seedlings benefit from a dark period of at least eight hours for proper growth regulation.
Never move indoor seedlings straight into full outdoor conditions. The hardening-off process takes seven to ten days and involves gradually increasing their exposure to outdoor sun, wind, and temperature fluctuations. Start with an hour or two of sheltered shade, then slowly extend the time and sun exposure each day.
Skip this step and your seedlings will suffer sunscald, windburn, or transplant shock — sometimes all three. Hardening off is non-negotiable for healthy transplants.
One of the best germinating seeds indoors tips is this: you can start for almost nothing or invest in a semi-professional setup. Both approaches work. Here's how the costs break down.
| Item | Budget Option | Mid-Range Option | Premium Option |
|---|---|---|---|
| Containers | Recycled yogurt cups (free) | 1020 flats + inserts ($5–$8) | Silicone cell trays ($15–$25) |
| Growing Medium | DIY peat/perlite mix ($4) | Commercial seed-start mix ($8) | Organic coco coir blocks ($12) |
| Lighting | Sunny window (free) | Shop-style LED bar ($25) | Full-spectrum grow panel ($60–$100) |
| Heat | Top of refrigerator (free) | Seedling heat mat ($15–$20) | Thermostat-controlled mat ($35–$50) |
| Humidity | Plastic wrap (free) | Humidity dome ($3–$5) | Adjustable vent dome ($8–$12) |
| Total Estimate | Under $5 | $55–$65 | $130–$200 |
Even the budget approach produces excellent results if you have a south-facing window with strong light. The mid-range setup is the sweet spot for most home gardeners — it pays for itself in a single season if you're growing high-value vegetables at home. Premium gear makes sense when you're starting hundreds of seedlings or growing in low-light conditions.
Standard germination timelines aren't set in stone. Several proven techniques can shave days off the process and boost your overall success rate.
Large, hard-coated seeds like morning glories, nasturtiums, and sweet peas germinate much faster after an overnight soak in warm water. The water softens the seed coat, allowing the embryo to break through sooner. For extremely tough coats, nick the surface with a file or sandpaper before soaking — this is called scarification, and it mimics the natural weathering process seeds would undergo outdoors.
Even medium-sized seeds like tomatoes and peppers benefit from a four-to-six-hour warm soak. You won't always see a dramatic difference, but across a full tray, pre-soaked seeds tend to emerge more uniformly.
Soil temperature matters more than air temperature for germination. A seedling heat mat raises the growing medium by 10°F to 20°F above ambient room temperature, which is the difference between five-day germination and two-week germination for many crops. Pair it with a thermostat probe to maintain a consistent target temperature without overheating.
Humidity domes trap moisture around the soil surface, preventing the top layer from drying out between waterings. Remove the dome as soon as you see the first sprouts emerge — leaving it on too long encourages mold and weakens stems.
Quick test: If you see condensation on the inside of your dome, your moisture level is adequate. If the dome is dry, mist the soil surface lightly before replacing it.
Indoor seed starting is powerful, but it's not the right move for every crop or every gardener. Here's an honest look at both sides.
On the plus side, you control every variable — light, temperature, moisture, and soil quality. You save significant money over buying transplants, especially at scale. You get access to far more cultivars than any nursery stocks. And you gain weeks of growing time in short-season climates.
The downsides are real, too. Indoor seed starting requires daily attention — you can't set it and forget it the way you might with direct-sown seeds. It takes up space in your home, and without proper lighting, seedlings stretch toward the nearest window and become weak. There's also a learning curve. Your first batch might not go perfectly, and that's normal.
Root-bound seedlings are another risk if you don't transplant on time. And some crops — carrots, radishes, beans, peas — genuinely do better with direct sowing. Starting those indoors adds work without adding benefit. If you're working with limited room, pairing indoor starts with creative small-space gardening techniques helps you maximize every square foot.
After years of starting seeds indoors, these are the errors that come up again and again — even among experienced growers.
This is the top killer, period. Seeds need moisture to germinate, but they also need oxygen. Waterlogged soil suffocates seeds and creates a breeding ground for damping-off fungus. If the soil surface looks shiny or pooled, you've added too much water. Switch to bottom watering and let the surface dry slightly between sessions.
Room temperature feels comfortable to you, but it's often 10°F below the optimal germination range for warm-season crops. A $15 heat mat solves this instantly. Don't rely on your thermostat — get a soil thermometer and check the actual temperature inside your cells.
Leggy, stretched-out seedlings are a sure sign of inadequate light. Even a bright window rarely provides enough intensity for stocky growth. Supplemental lighting positioned close to the seedling canopy — two to four inches — is the fix. Raise the lights as the plants grow, maintaining that gap consistently.
It sounds minor, but unlabeled trays lead to confusion fast. You'll forget which variety is which, lose track of sow dates, and make timing mistakes at transplant. Label every cell or row with variety name and sowing date. Waterproof markers on plastic stakes work better than masking tape, which peels off in humid conditions.
Sometimes you do everything right and still get poor germination. Here's how to diagnose and fix the most common issues.
Seed viability drops with age, and storage conditions matter enormously. Seeds kept in a cool, dry, dark place maintain viability far longer than those left in a hot garage or humid shed. Most vegetable seeds stay viable for two to five years under good storage, but germination rates decline steadily. Understanding the characteristics of different growing media can also affect how well aged seeds perform.
Before committing a full tray to questionable seeds, run a simple viability test. Place ten seeds on a damp paper towel, fold it over, seal it in a plastic bag, and keep it warm for a week. Count how many germinate — that percentage tells you what to expect from the batch.
If your seedlings emerge and then suddenly collapse at the soil line, damping-off is almost certainly the culprit. This fungal disease thrives in cool, wet, stagnant conditions. Prevention is your best defense: use sterile starting mix, avoid overwatering, provide air circulation with a small fan, and remove humidity domes as soon as seeds sprout.
When nothing comes up at all, check three things in order. First, soil temperature — was it in the correct range for that specific crop? Second, planting depth — did you bury the seeds too deep? Third, seed quality — were the seeds expired, exposed to moisture, or stored improperly? Addressing whichever factor was off usually solves the problem on your next attempt.
Most vegetable seeds germinate best between 65°F and 85°F soil temperature. Warm-season crops like tomatoes and peppers prefer the upper end of that range (75°F to 85°F), while cool-season crops like lettuce and spinach germinate well at 60°F to 70°F. Always check the seed packet for species-specific recommendations.
Germination time varies widely by species. Fast germinators like radishes and lettuce can sprout in three to five days. Tomatoes and peppers typically take seven to fourteen days. Some herbs and flowers may need three to four weeks. Consistent warmth and moisture are the biggest factors in speeding up the process.
Standard potting soil is too dense and coarse for seed starting. It holds too much water, compacts around tiny roots, and may contain pathogens or weed seeds. Use a dedicated seed-starting mix made from fine peat or coco coir and perlite for the best results.
Technically, a bright south-facing window can work for a small number of seedlings. However, grow lights produce significantly stronger, stockier seedlings because they deliver consistent, full-spectrum light at close range. For anything beyond a few pots on a windowsill, grow lights are worth the investment.
Keep the soil consistently moist but never soggy during germination. With a humidity dome in place, you may only need to mist every two to three days. Without a dome, check moisture daily by pressing your finger gently into the surface. Bottom watering is the safest method to prevent overwatering and fungal issues.
Remove the dome as soon as you see the first seedlings breaking the soil surface. Leaving it on after germination creates an overly humid environment that promotes mold, damping-off, and weak stem development. If you have a mixed tray where some cells sprout before others, crack the dome vents open rather than removing it entirely.
Leggy seedlings are almost always caused by insufficient light. The stems stretch toward the nearest light source, growing tall and weak rather than short and sturdy. Move your grow lights closer — two to four inches from the top of the seedlings — and ensure they run for 14 to 16 hours per day. A gentle fan can also strengthen stems by simulating wind.
 |
 |
 |
 |

About Truman Perkins
Truman Perkins is a Detroit-based SEO consultant who's been in the business for over a decade. He got his start helping friends and clients get their websites off the ground, and he continues to do so today. In his free time, Truman enjoys learning and writing about gardening - something he believes is a natural stress reliever. He lives with his wife, Jenny, and their twins in Detroit.
Get new FREE Gifts. Or latest free growing e-books from our latest works.
Disable Ad block to reveal all the links. Once done, hit a button below
|
|
|
|